The Guide
Everything that isn’t a recipe: safety, parts, measuring, cleaning, and troubleshooting for the Home Bakery Mini — plus the full manual if you need it.
Which model is this for?
The Home Bakery Mini ships in two regional versions, and this app covers both:
- BB-HAQ10 — the 220–230V version (10 amp outlet minimum), sold outside North America. Its manual uses °C and centimetres.
- BB-HAC10 — the 120V North American version (15 amp outlet minimum). Its manual uses °F and inches.
The two machines run the same courses, timings and recipes — only the mains voltage and the printed units differ. Every recipe here gives oven temperatures in both scales (for example 180°C (350°F)), so you can follow along on either model.
⚠️ The one thing that is not interchangeable is the power supply — plug each model into the voltage printed on its own rating label, and never into the other’s.
Safety first+
Warnings
- Only a qualified repair technician should disassemble or modify the Home Bakery — never attempt repairs yourself.
- Never immerse the Main Body or Lid in water, or splash water on it.
- Use the outlet your model calls for, with nothing else plugged into it: 120V AC rated at 15 amperes or more for the BB-HAC10, or 220–230V AC rated at 10 amperes or more for the BB-HAQ10.
- Don’t use the Home Bakery outdoors, and never let the cord hang over a table edge or touch a hot surface.
- Keep the Home Bakery out of children’s reach, and never leave it unsupervised around infants.
- Don’t touch the Steam Vent — it releases genuinely hot steam.
- Insert the power plug fully and securely. A loose plug can cause shock, short-circuit, smoke, or fire.
- Don’t plug or unplug the power plug with wet hands.
Cautions
- Unplug by holding the plug itself, never by pulling the cord.
- Let the Home Bakery cool completely before cleaning — the Main Body, Baking Pan, Kneading Blade, and inside the Lid stay hot after baking.
- Don’t place or use it on an unstable surface, or on anything heat-sensitive.
- Keep it away from walls, curtains, and shelving while in use or shortly after — steam and heat can damage or discolor them.
- If the power cord is damaged, have it replaced by the manufacturer, its service agent, or a similarly qualified person.
Parts & handling+
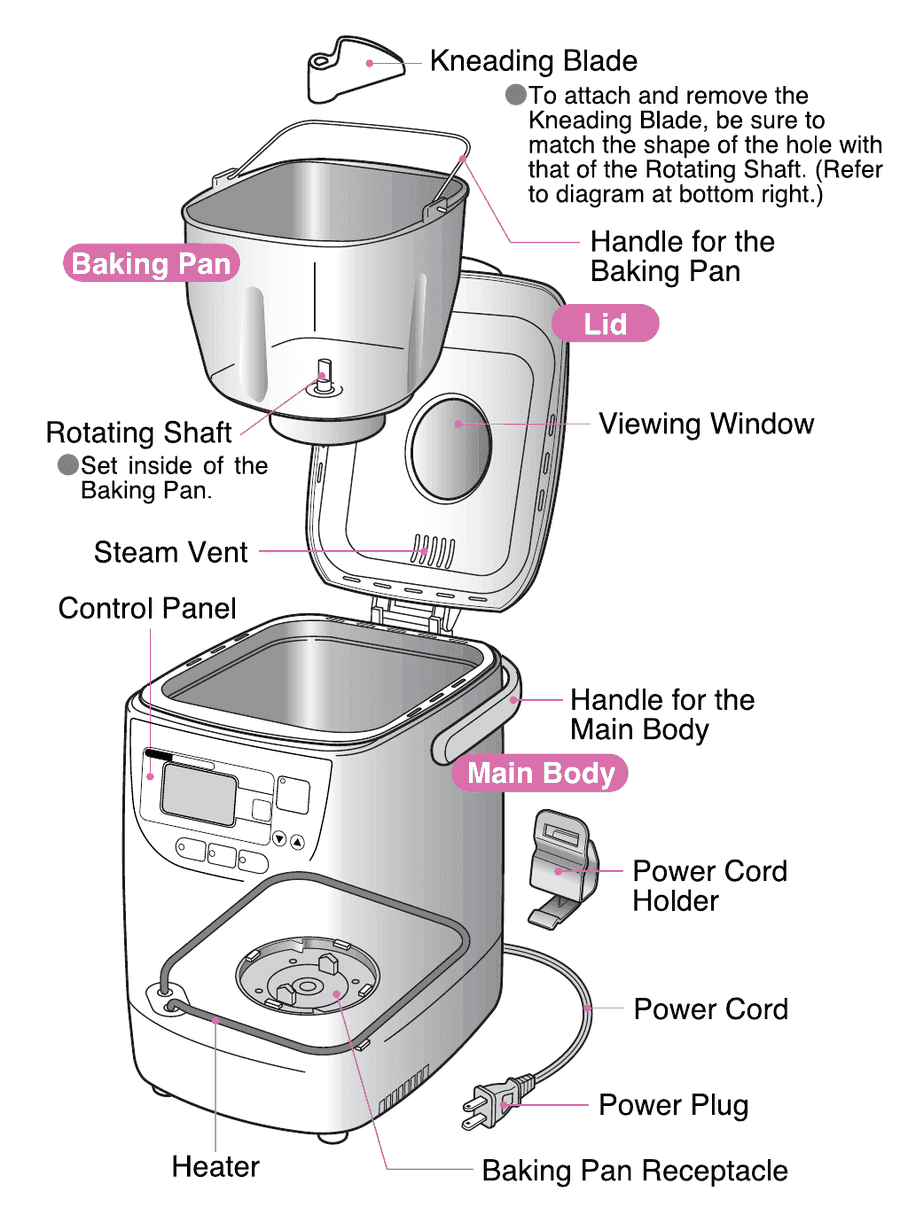
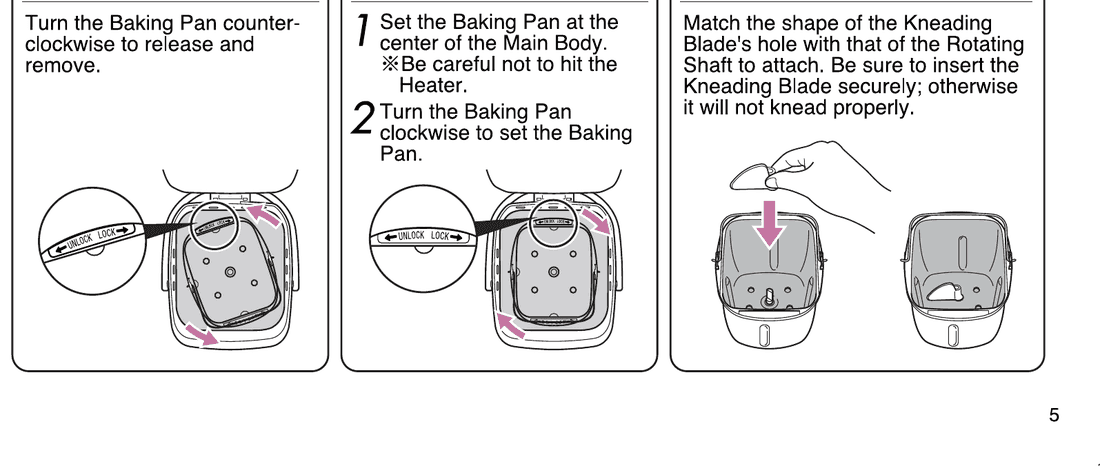
Seat the Kneading Blade firmly — if it isn’t pushed all the way onto the Rotating Shaft, the machine won’t knead properly.
- Baking Pan — sits inside the Main Body on the Rotating Shaft; lift out by turning counterclockwise.
- Kneading Blade — match its hole to the Rotating Shaft to attach; twist to release when removing.
- Lid — open at a 45° angle, then pull up and toward you to remove; reverse to reattach.
- Steam Vent — never cover it during use.
- Control Panel — DISPLAY, MODE SELECT, CRUST CONTROL, TIMER, START/RESET, COOKIE/PASTA DOUGH, CAKE, and JAM keys.
- Handle — always use it (with oven mitts once hot) to lift the Baking Pan.
Measuring ingredients+
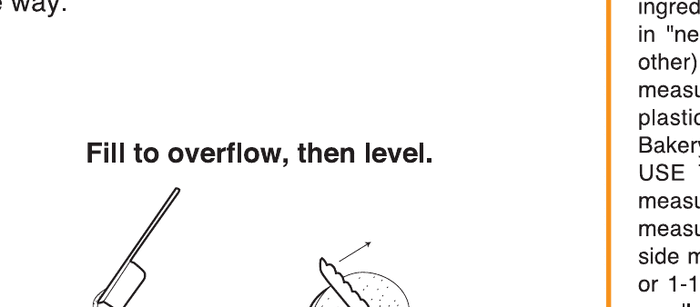
Dry ingredients
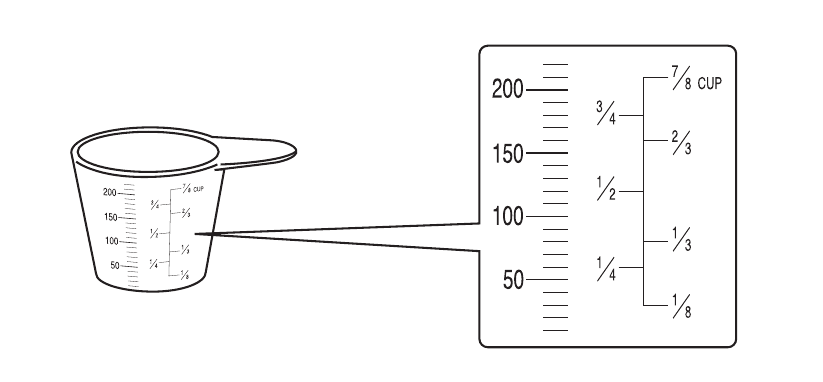
Spoon dry ingredients into the measuring cup until it overflows — don’t press or shake it down. Level off the excess with a straight edge like the back of a knife. For the 3/4 cup and 1/4 cup marks, fill and level the 1/2 cup first, then add the rest.
Liquids
Pour liquid into the cup, place it on a flat surface, and read the measurement at eye level.
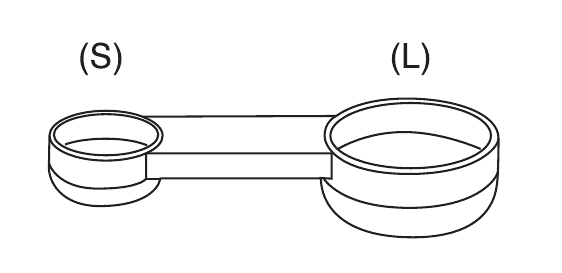
The included Measuring Spoon has two sides: the large side is 1 tablespoon, the small side is 1 teaspoon. The halfway mark on each means half a tablespoon or half a teaspoon. This app’s unit toggle (Cups / Tbsp / mL / Grams) on every recipe covers the same ground if you’d rather use a liquid measuring cup or a kitchen scale instead.
The control panel+
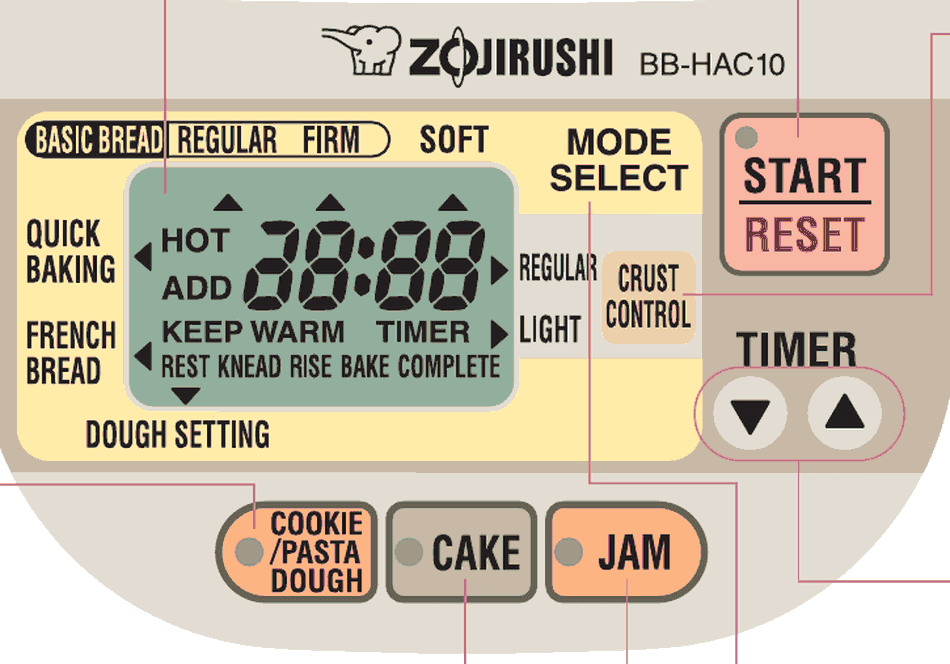
- MODE SELECT — steps through Basic (Regular/Firm), Soft, Quick Baking, French Bread and Dough Setting.
- CRUST CONTROL — Light or Regular. Only on Basic, Quick Baking and Cake.
- TIMER ▼▲ — delays completion in 10-minute steps, up to 13 hours.
- START/RESET — starts a course; press and hold to cancel one.
- COOKIE/PASTA DOUGH, CAKE, JAM — dedicated keys, each with its own fixed cycle.
- Display — counts remaining time down in 1-minute steps; shows “HOT”, “ADD” and “COMPLETE” as the cycle runs.
Using the Timer+
- Press MODE SELECT to choose your course.
- Press the TIMER key and use the arrows to set how many hours from now you’d like your bread to be ready — it adjusts in 10-minute steps, up to a maximum of 13 hours.
- Press START/RESET and confirm the operation lamp is on.
The Timer is only available on Basic (Regular/Firm), Soft, and French Bread courses — and never for recipes containing milk, juice, vegetables, eggs, or other ingredients that can spoil while they wait. Each recipe page notes when this applies.
Cleaning & maintenance+
- Main Body & Lid: wipe with a well-wrung cloth. Never soak or splash water on them.
- Baking Pan: soften stuck dough with water or lukewarm water, then wash with a sponge and kitchen detergent. Never soak the pan itself in water, and never wash the bottom exterior — it can cause rust or malfunction.
- Kneading Blade: wash with a sponge; if the center hole is clogged, soak in water and clear it with a chopstick, toothpick, or soft brush.
- Measuring Cup & Spoon: wash with a sponge after every use.
- Avoid metal utensils, abrasive cleaners, and scrubbing brushes on the nonstick coating — they’ll damage it.
- Let everything cool and dry fully before storing, and keep the Lid closed with nothing placed on top.
Q&A for baking bread+
- Crust harder than expected? The Basic course is tuned for a soft crust — for softer results, wrap cooled bread in a plastic bag, or try the Soft course.
- Loaf size or shape varies? Room temperature, weather, humidity, altitude, and household current all affect the rise. Fresh, accurately measured ingredients help.
- Flour sticks to the side of the pan? Normal during initial mixing — scrape it off the finished loaf with a sharp knife.
- Dough too sticky or too dry? Adjust with a little extra cold water or flour, dusted onto the kneading surface as needed.
- Can I use eggs? Yes — reduce water slightly and add the eggs in the Measuring Cup to measure accurately. Don’t use the Timer when eggs are involved.
- Why can’t the Timer go past 13 hours? Ingredients can spoil and dough quality suffers over longer waits.
- Bread smells odd sometimes? Usually too much yeast, or stale/unfresh ingredients (especially flour and water). Always measure accurately and use fresh ingredients.
Troubleshooting+
If a loaf doesn’t turn out right, the fix is almost always in the measuring — check yeast first, then liquids, then dry ingredients.
| Symptom | Likely cause |
|---|---|
| Loaf rises then falls | Too much water/milk or yeast; decrease slightly next time. |
| Loaf rises too high | Too much water, sugar/honey, or yeast; too little salt. |
| Loaf doesn’t rise enough | Too little water or yeast; too much salt or flour; yeast not fresh, or wrong type/amount used. |
| Loaf is short and heavy | Too little water, sugar/honey, or yeast; too much flour. |
| Light crust / undercooked | Too much water or flour; too little sugar/honey. |
| Overcooked / dark crust | Too much sugar/honey or yeast. |
| Smoke from the Steam Vent | Ingredients or crumbs on the Heating Element — clean the unit after each use and let it cool before unplugging. |
| Display shows “E:01” | Temperature sensor malfunction — contact the store you purchased it from. |
Install & use offline+
Install bread. from your browser menu — look for Install app or Add to Home Screen. It opens full screen, with no browser bars eating the recipe.
Checking offline support…
Full manual (PDF)+
This is the original Zojirushi Operating Instructions & Recipes booklet, embedded below for reference.
📄 The copy embedded here is the BB-HAC10 (120V) edition, because it’s the clearest scan available. If you have the BB-HAQ10 (220–230V), the recipes, courses and timings on these pages are the same as yours — but read its oven temperatures in °F and its measurements in inches, and follow your machine’s rating label for the power supply, not this booklet’s.
Open full PDF ↗